> ## Documentation Index
> Fetch the complete documentation index at: https://docs.taap.it/llms.txt
> Use this file to discover all available pages before exploring further.
# Shopify
> Automatic conversion tracking for Shopify stores — add a script tag and configure webhooks
import { Steps, Step } from "fumadocs-ui/components/steps";
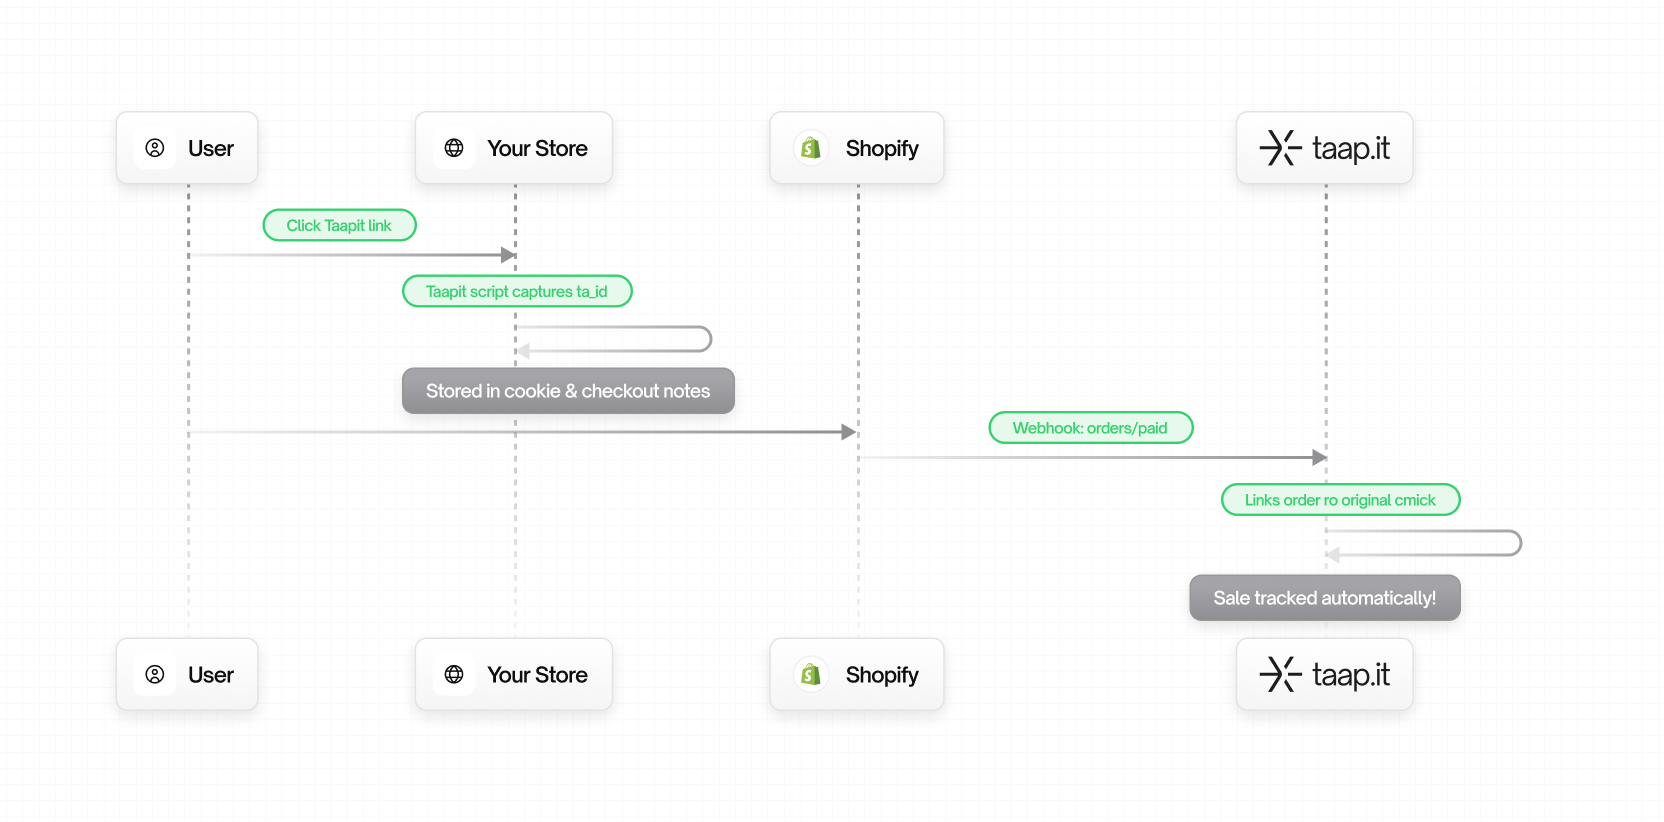
The Taapit Shopify integration provides **fully automatic** conversion tracking with no app to install. Add one script tag to your theme, configure three webhooks, and every checkout and order is automatically attributed to your Taapit links.
## How it works
 ## Features
* ✅ **No app required** – Just a script tag and webhooks
* ✅ **Automatic tracking** – Every checkout and order is tracked
* ✅ **Full attribution** – Works across sessions (90-day cookie)
* ✅ **Real-time sync** – Events appear instantly
* ✅ **Multi-currency** – Supports all Shopify currencies
## Prerequisites
**Important**: For conversion tracking to work, users must arrive on your
store via a **Taapit deeplink**. This is how the tracking ID (`ta_tid`) is
generated and passed to your store.
**Hide the "Buy Now" button**: The Buy Now (accelerated checkout) button
bypasses the cart and goes directly to payment — this flow **cannot be
tracked**. You must disable it in your theme so all customers go through the
standard Add to Cart → Checkout flow.
To hide it: open your theme editor → select a product page section → find
**Dynamic checkout buttons** and uncheck it, then save.
Before you start:
1. **Create a Taapit deeplink** pointing to your Shopify store or a product page
2. **Enable conversion tracking** on your link in the Taapit dashboard
## Installation
Copy this script tag:
```html theme={null}
```
Then add it to your theme:
1. In Shopify Admin, go to **Online Store** → **Themes**
2. Click **Customize** → **Edit code** on your active theme
3. Open the **theme.liquid** file
4. Paste the script just before the `` closing tag, then save
The script captures the `ta_tid` tracking ID from Taapit links and stores it in a cookie and localStorage for 90 days. It also attaches the tracking ID to cart attributes so it survives through to the order.
You need to create **3 webhooks** in Shopify pointing to your Taapit webhook URL.
Your webhook URL (found in your Taapit dashboard under Settings → Analytics → Shopify):
```
https://track.taap.it/api/shopify/webhook?workspaceId=YOUR_WORKSPACE_ID
```
**Steps to configure in Shopify:**
1. In Shopify Admin, go to **Settings** → **Notifications**
2. Scroll down to the **Webhooks** section and click **Create webhook**
3. Choose an event: **Order payment** → paste the webhook URL → save
4. Repeat for **Checkout creation**
5. Repeat for **Checkout update**
You must create **3 separate webhooks** with the same URL:
* `orders/paid` → tracks a **Sale** event
* `checkouts/create` → tracks a **Lead** event
* `checkouts/update` → updates the Lead if the cart changes
Your workspace ID is already included in the URL shown in your dashboard.
1. Visit your store from a Taapit link (you should see `?ta_tid=xxx` in the URL)
2. Check browser DevTools → Application → Cookies for `ta_tid`
3. Add a product to the cart and proceed to checkout
4. Check the **Analytics** tab in Taapit — a Lead event should appear
5. Complete a test order — a Sale event should appear
## How Tracking Works
1. **Visitor arrives** via Taapit link with `?ta_tid=xxx`
2. **Script captures** the `ta_tid` and stores it in a cookie and localStorage
3. **Script adds** the tracking ID to cart attributes (persists through checkout)
4. **Customer clicks Checkout** — the tracking ID is forwarded via cart attributes
5. **Order webhook** sends order details + tracking ID to Taapit
6. **Conversion recorded** and attributed to the original link
This flow only works if the customer goes through the **standard cart checkout**.
The Buy Now (accelerated checkout) button bypasses the cart, so the tracking
ID is never attached. Make sure to disable it in your theme.
## Tracked Events
| Shopify Event | Taapit Event | When |
| ------------------ | ------------ | ------------------------ |
| `checkouts/create` | Lead | Customer starts checkout |
| `checkouts/update` | Lead update | Cart is modified |
| `orders/paid` | Sale | Order is paid |
## Troubleshooting
Make sure you are visiting the store from a Taapit link that contains `?ta_tid=xxx` in the URL. The script only sets the cookie when this parameter is present.
1. Check that the script tag is present in your theme.liquid (before ``)
2. Check that all 3 webhooks are correctly configured with your workspace ID
3. Check that the Buy Now button is hidden — orders placed through it cannot be tracked
4. Verify the `ta_tid` cookie is set in your browser DevTools
Works with all Shopify themes that allow editing theme.liquid. For headless setups (Hydrogen, custom storefronts), use the [Manual Client-side Integration](/conversions/manual/client-side) instead.
## Next Steps
Also using Stripe? Add the Stripe integration.
Create a Taapit link to start tracking.
## Features
* ✅ **No app required** – Just a script tag and webhooks
* ✅ **Automatic tracking** – Every checkout and order is tracked
* ✅ **Full attribution** – Works across sessions (90-day cookie)
* ✅ **Real-time sync** – Events appear instantly
* ✅ **Multi-currency** – Supports all Shopify currencies
## Prerequisites
**Important**: For conversion tracking to work, users must arrive on your
store via a **Taapit deeplink**. This is how the tracking ID (`ta_tid`) is
generated and passed to your store.
**Hide the "Buy Now" button**: The Buy Now (accelerated checkout) button
bypasses the cart and goes directly to payment — this flow **cannot be
tracked**. You must disable it in your theme so all customers go through the
standard Add to Cart → Checkout flow.
To hide it: open your theme editor → select a product page section → find
**Dynamic checkout buttons** and uncheck it, then save.
Before you start:
1. **Create a Taapit deeplink** pointing to your Shopify store or a product page
2. **Enable conversion tracking** on your link in the Taapit dashboard
## Installation
Copy this script tag:
```html theme={null}
```
Then add it to your theme:
1. In Shopify Admin, go to **Online Store** → **Themes**
2. Click **Customize** → **Edit code** on your active theme
3. Open the **theme.liquid** file
4. Paste the script just before the `` closing tag, then save
The script captures the `ta_tid` tracking ID from Taapit links and stores it in a cookie and localStorage for 90 days. It also attaches the tracking ID to cart attributes so it survives through to the order.
You need to create **3 webhooks** in Shopify pointing to your Taapit webhook URL.
Your webhook URL (found in your Taapit dashboard under Settings → Analytics → Shopify):
```
https://track.taap.it/api/shopify/webhook?workspaceId=YOUR_WORKSPACE_ID
```
**Steps to configure in Shopify:**
1. In Shopify Admin, go to **Settings** → **Notifications**
2. Scroll down to the **Webhooks** section and click **Create webhook**
3. Choose an event: **Order payment** → paste the webhook URL → save
4. Repeat for **Checkout creation**
5. Repeat for **Checkout update**
You must create **3 separate webhooks** with the same URL:
* `orders/paid` → tracks a **Sale** event
* `checkouts/create` → tracks a **Lead** event
* `checkouts/update` → updates the Lead if the cart changes
Your workspace ID is already included in the URL shown in your dashboard.
1. Visit your store from a Taapit link (you should see `?ta_tid=xxx` in the URL)
2. Check browser DevTools → Application → Cookies for `ta_tid`
3. Add a product to the cart and proceed to checkout
4. Check the **Analytics** tab in Taapit — a Lead event should appear
5. Complete a test order — a Sale event should appear
## How Tracking Works
1. **Visitor arrives** via Taapit link with `?ta_tid=xxx`
2. **Script captures** the `ta_tid` and stores it in a cookie and localStorage
3. **Script adds** the tracking ID to cart attributes (persists through checkout)
4. **Customer clicks Checkout** — the tracking ID is forwarded via cart attributes
5. **Order webhook** sends order details + tracking ID to Taapit
6. **Conversion recorded** and attributed to the original link
This flow only works if the customer goes through the **standard cart checkout**.
The Buy Now (accelerated checkout) button bypasses the cart, so the tracking
ID is never attached. Make sure to disable it in your theme.
## Tracked Events
| Shopify Event | Taapit Event | When |
| ------------------ | ------------ | ------------------------ |
| `checkouts/create` | Lead | Customer starts checkout |
| `checkouts/update` | Lead update | Cart is modified |
| `orders/paid` | Sale | Order is paid |
## Troubleshooting
Make sure you are visiting the store from a Taapit link that contains `?ta_tid=xxx` in the URL. The script only sets the cookie when this parameter is present.
1. Check that the script tag is present in your theme.liquid (before ``)
2. Check that all 3 webhooks are correctly configured with your workspace ID
3. Check that the Buy Now button is hidden — orders placed through it cannot be tracked
4. Verify the `ta_tid` cookie is set in your browser DevTools
Works with all Shopify themes that allow editing theme.liquid. For headless setups (Hydrogen, custom storefronts), use the [Manual Client-side Integration](/conversions/manual/client-side) instead.
## Next Steps
Also using Stripe? Add the Stripe integration.
Create a Taapit link to start tracking.