> ## Documentation Index
> Fetch the complete documentation index at: https://docs.taap.it/llms.txt
> Use this file to discover all available pages before exploring further.
# Stripe
> Automatic conversion tracking for Stripe payments
import { Steps, Step } from "fumadocs-ui/components/steps";
The Taapit Stripe integration automatically tracks all your Stripe payments as sales conversions. Just install the SDK, connect the app, and pass the tracking ID to Stripe.
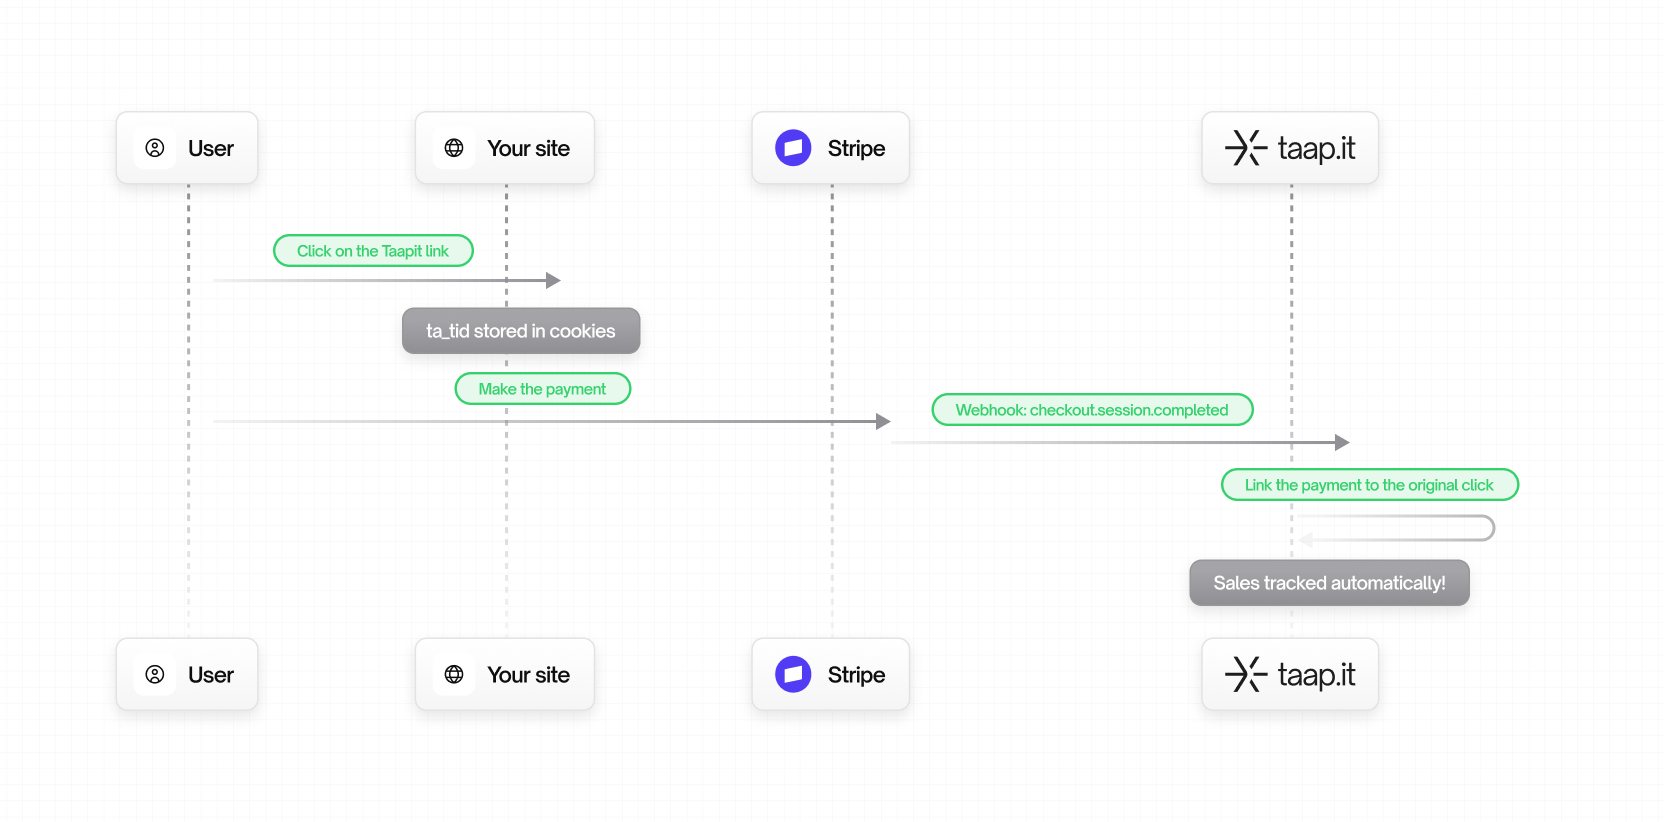
## How it works
## Prerequisites
**Important**: For conversion tracking to work, users must arrive on your
website via a **Taapit deeplink**. This is how the tracking ID (`ta_tid`) is
generated and passed to your site.
Before you start:
1. **Create a Taapit deeplink** pointing to your website or landing page
2. **Enable conversion tracking** on your link:
* Go to your link settings in the Taapit dashboard
* Enable **Conversion Tracking**
3. **Configure Stripe integration** in [Settings → Conversion](https://taap.it/dashboard/settings/conversion) and select **Stripe Integration**
```mermaid theme={null}
flowchart LR
A[User clicks Taapit link] --> B[Lands on your site with ta_tid]
B --> C[SDK stores ta_tid in cookie]
C --> D[User makes purchase]
D --> E[ta_tid sent to Stripe]
E --> F[Taapit tracks conversion]
```
## Installation
First, add the Taapit SDK to your website to capture the `ta_tid` tracking ID:
```bash theme={null}
npm install taapit-sdk
```
Then add the Analytics component to your root layout:
```tsx app/layout.tsx theme={null}
import { Analytics } from 'taapit-sdk/react';
export default function RootLayout({ children }) {
return (
{children}
);
}
```
Add this script to your HTML `` or before ``:
```html theme={null}
```
This step is **required**. Without the SDK, the `ta_tid` won't be captured and conversions can't be tracked.
1. Go to the [Stripe App Marketplace](https://marketplace.stripe.com/)
2. Search for "Taapit Conversion"
3. Click **Install**
Or install directly from your Taapit dashboard:
1. Go to **Settings** → **Integrations** → **Stripe**
2. Click **Install Stripe Integration**
After installing the app in Stripe:
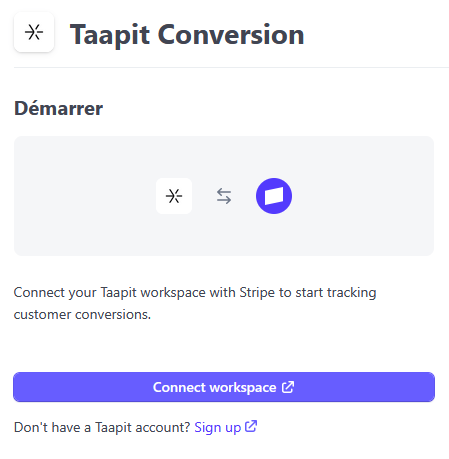
**1. Open the Taapit app in your Stripe dashboard and click "Connect workspace"**
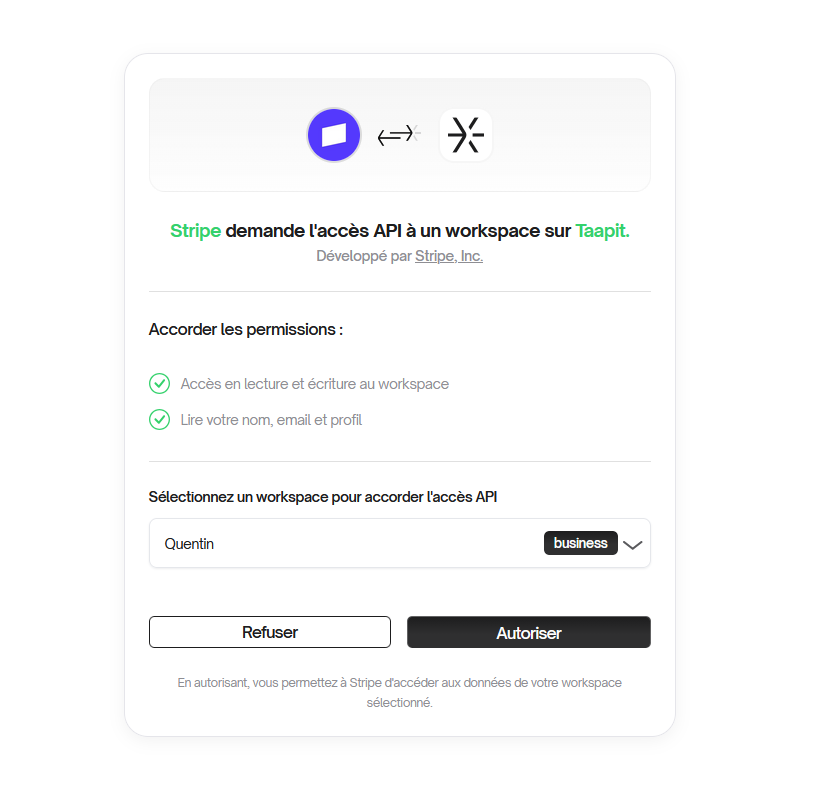
**2. Authorize the connection to your Taapit workspace**
You will be redirected to the Taapit consent page. Select the workspace you want to connect and click **Authorize**.
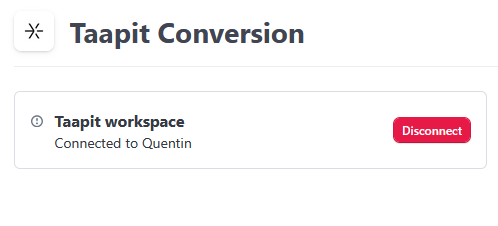
**3. Verify the workspace is connected**
Once authorized, you will see your workspace connected in the Stripe app.
Pass the `ta_tid` to Stripe when creating customers, checkout sessions, or payment intents.
### 1. Frontend: Get the tracking ID
First, retrieve the tracking ID from your frontend to pass it to your API:
```typescript theme={null}
// Using the taapit global object (script tag)
const trackingId = taapit.getTrackingId();
```
```tsx theme={null}
import { useTaapitAnalytics } from 'taapit-sdk/react';
function CheckoutButton() {
const { trackingId } = useTaapitAnalytics();
const handleCheckout = async () => {
const response = await fetch('/api/create-checkout', {
method: 'POST',
headers: { 'Content-Type': 'application/json' },
body: JSON.stringify({
priceId: 'price_xxx',
trackingId,
}),
});
const { url } = await response.json();
window.location.href = url;
};
return ;
}
```
```typescript theme={null}
// Read directly from cookie
const trackingId = document.cookie
.split('; ')
.find(row => row.startsWith('ta_tid='))
?.split('=')[1];
```
The tracking ID can be retrieved from:
1. **Taapit SDK** - `taapit.getTrackingId()` or `useTaapitAnalytics()` hook
2. **Cookie** (`ta_tid`) - automatically set by the SDK
The backend should check both the request body and cookies for maximum compatibility.
***
### 2. Track Sales: Create a Checkout Session
When a user makes a purchase, pass the tracking ID in the checkout session metadata.
**When is `taapitTrackingId` required for Checkout Sessions?**
* If the customer was **already tracked via a lead event** (using `taapitCustomerExternalId`), the `taapitTrackingId` is **optional** - you only need to pass `taapitCustomerExternalId` to link the sale.
* If this is a **new customer** (no prior lead), `taapitTrackingId` is **required** to attribute the sale.
```typescript app/api/create-checkout/route.ts theme={null}
import { NextRequest } from 'next/server';
import Stripe from 'stripe';
const stripe = new Stripe(process.env.STRIPE_SECRET_KEY!);
export async function POST(request: NextRequest) {
const body = await request.json();
const { priceId, customerExternalId } = body;
// Get tracking ID from cookie OR from request body
// Optional if customer already tracked via lead
const trackingId =
request.cookies.get('ta_tid')?.value ||
body.trackingId ||
'';
const session = await stripe.checkout.sessions.create({
mode: 'subscription',
line_items: [{ price: priceId, quantity: 1 }],
success_url: 'https://yoursite.com/success',
cancel_url: 'https://yoursite.com/cancel',
// Pass tracking ID and customer ID in metadata
metadata: {
taapitTrackingId: trackingId, // Optional if customer exists
taapitCustomerExternalId: customerExternalId, // Required
},
// Also in subscription_data for subscriptions
subscription_data: {
metadata: {
taapitTrackingId: trackingId,
taapitCustomerExternalId: customerExternalId,
},
},
});
return Response.json({ url: session.url });
}
```
***
### 3. (Optional) Track Leads: Create a Stripe Customer
If you want to track leads separately from sales, create a Stripe customer with the tracking ID when a user signs up. Taapit listens to the `customer.created` webhook.
```typescript app/api/stripe/create-customer/route.ts theme={null}
import { NextRequest } from 'next/server';
import Stripe from 'stripe';
const stripe = new Stripe(process.env.STRIPE_SECRET_KEY!);
export async function POST(request: NextRequest) {
const body = await request.json();
const { email, name, externalId } = body;
// Get tracking ID from cookie OR from request body
const trackingId =
request.cookies.get('ta_tid')?.value ||
body.trackingId ||
'';
// Create Stripe customer with Taapit metadata
const customer = await stripe.customers.create({
email,
name,
metadata: {
taapitTrackingId: trackingId,
taapitCustomerExternalId: externalId, // Your internal user ID
},
});
return Response.json({ customerId: customer.id });
}
```
This step is **optional**. Use it if you want to track user signups as leads before they make a purchase.
***
### 4. (Alternative) Using Stripe Payment Links
If you're using [Stripe Payment Links](https://stripe.com/docs/payment-links), you can track sales automatically without writing any backend code.
With Payment Links, only **sale events** are tracked. Lead webhooks are not created.
**How to set it up:**
1. Get your Stripe Payment Link URL (e.g., `https://buy.stripe.com/xxx`)
2. Add `?taapit_client_reference_id=1` to the URL:
```
https://buy.stripe.com/xxx?taapit_client_reference_id=1
```
3. Shorten this URL with Taapit
**How it works:**
When a user clicks on your Taapit deeplink, Taapit automatically:
1. Replaces `taapit_client_reference_id=1` with `client_reference_id=taapit_tid_{trackingId}`
2. Stripe receives the tracking ID as `client_reference_id`
3. When checkout completes, Taapit attributes the sale to the original click
1. Go to **Settings** → **Integrations** → **Stripe** in Taapit
2. You should see **Connected** status
3. Make a test payment
4. Check the **Analytics** tab for the conversion
## Tracked Events
The Stripe integration automatically tracks these events:
| Stripe Event | Taapit Event | Description |
| ---------------------------- | ------------ | --------------------------------------- |
| `customer.created` | Lead | Customer created with tracking metadata |
| `checkout.session.completed` | Sale | Checkout session completed |
| `invoice.paid` | Sale | Subscription invoice paid |
## Metadata Fields
The integration looks for these metadata fields on Stripe objects:
| Field | Required | Description |
| -------------------------- | --------- | ------------------------------------------ |
| `taapitTrackingId` | See below | The tracking ID (`ta_tid` from the cookie) |
| `taapitCustomerExternalId` | Yes | Your internal user ID |
Use `taapitTrackingId` (not `ta_tid`) in Stripe metadata. The `ta_tid` is the
cookie name, while `taapitTrackingId` is the metadata field name.
**When is `taapitTrackingId` required?** - **Lead events**
(`customer.created`): `taapitTrackingId` is **always required** - **Sale
events** (`checkout.session.completed`, `invoice.paid`): - If the customer was
**already tracked via a lead event** (using `taapitCustomerExternalId`), the
`taapitTrackingId` is **optional** - you only need the
`taapitCustomerExternalId` - If this is a **new customer** (no prior lead),
`taapitTrackingId` is **required** to attribute the sale
## Troubleshooting
1. **Check metadata**: Ensure `taapitTrackingId` is in your Stripe metadata
2. **Verify webhook delivery**: In Stripe → Developers → Webhooks 3. **Check
connection**: Settings → Integrations → Stripe should show "Connected"
If the tracking ID is empty, the user either: - Didn't come from a Taapit
link - Has cookies blocked - Cookie wasn't passed to checkout This is normal
for organic/direct traffic.
## Security
| Permission | Purpose |
| ----------------------- | ------------------------------ |
| `customer_read` | Read customer information |
| `subscription_read` | Read subscription data |
| `invoice_read` | Read invoice amounts |
| `checkout_session_read` | Read checkout session metadata |
| `webhook_read` | Receive payment events |
## FAQ
Yes, you need the Taapit SDK on your website to capture the `ta_tid` cookie.
The Stripe app only handles payment tracking.
{" "}
Each `invoice.paid` event triggers a sale. The tracking ID from the original
checkout is used for attribution.
Currently, refunds are not automatically tracked. We're working on this
feature.
## Next Steps
Set up automatic tracking for Shopify stores.
For custom payment flows.
 ## Prerequisites
 **2. Authorize the connection to your Taapit workspace**
You will be redirected to the Taapit consent page. Select the workspace you want to connect and click **Authorize**.
**2. Authorize the connection to your Taapit workspace**
You will be redirected to the Taapit consent page. Select the workspace you want to connect and click **Authorize**.
 **3. Verify the workspace is connected**
Once authorized, you will see your workspace connected in the Stripe app.
**3. Verify the workspace is connected**
Once authorized, you will see your workspace connected in the Stripe app.